
Your Custom Text Here
Baked Brooklyn's Pumpkin Whoopie Pies (and Nutella Hot Chocolate )

My husband's birthday was coming up fast and I needed to pull a plan together. Absolutely nothing was going to top his 35th birthday weekend, which was last year. To celebrate the special day the last time around I really pulled out all the stops: Park Avenue Autumn for brunch, Nara at the Asia Society in the afternoon, Daniel for dinner (oui!) and tickets to Yankee post-season baseball (props to my mom for getting the tickets). The next day we went to Diner for brunch, Spa Castle for relaxation and then apple picking Upstate. It was great and it was going to be hard to replicate anything like that this year...especially since there's an 11 week old in the house and we haven't secured a babysitter.
I picked up a gift and decided to go with something more muted-- a little more family friendly-- and very local. I went with brunch in our house. Of course the best gift I gave my husband was the gift of sleep. He slept till 11:00 AM and woke up to a birthday brunch.
I made a three egg omelette with Gruyere cheese, topped with homemade salsa verde, and some breakfast potatoes on the side. It was delicious. But the piece de resistance was the pumpkin whoopie pie from Baked, Brooklyn. Yes, *that* whoopie pie-- the one that won top 100 tastes of 2007 by Time Out New York.
Baked is one of my most favorite bakeries (miss you!), and this recipe is from their cookbook Baked: New Frontiers in Baking.
If you really want to go a little over the top, pair it with nutella hot chocolate. It's perfect for a chilly fall night. It's lip-smacking good!
* * *
Baked Brooklyn's Pumpkin Whoopie Pies (Courtesy of Baked: New Frontiers in Baking)Ingredients
3 cups all-purpose flour
1 teaspoon salt
1 teaspoon baking powder
1 teaspoon baking soda
2 tablespoons cinnamon
1 tablespoon ground ginger
1 tablespoon ground cloves
2 cups packed dark-brown sugar
1 cup vegetable oil
3 cups chilled pumpkin purée
2 large eggs
1/2 teaspoon vanilla extract
3 cups confectioners sugar
1/2 cup (1 stick) unsalted butter, softened
8 ounces cream cheese, softened
1 teaspoon vanilla extract
Directions
Preheat oven to 350°F. Line two baking sheets with parchment paper.
In a large bowl, whisk the flour, salt, baking powder, baking soda, cinnamon, ginger, and cloves together and set aside.
In a separate bowl, whisk the brown sugar and oil together until combined. Add the pumpkin puree and whisk to combine thoroughly. Add the eggs and vanilla and whisk until combined.
Sprinkle the flour mixture over the pumpkin mixture and whisk until completely combined.
Use a small ice cream scoop with a release mechanism to drop heaping tablespoons of the dough onto prepared baking sheets, about one inch apart. Bake for 10 to 12 minutes, until the cookies are just starting to crack on top and a toothpick inserted into the center of the cookie comes out clean. Remove from the oven and let the cookies cool completely on the pan while you make the filling.
(I used a whoopie pie pan so the domes were very smooth and round. I think you get a more 'rustic' cookie, if I can call it that, when you put dough on baking sheets.)
For the Cream Cheese Filling:
Sift the confectioners' sugar into a medium bowl and set aside.
In the bowl of an electric mixer fitted with paddle attachment, beat the butter until it's completely smooth, with no visible lumps. Add the cream cheese and beat until combined.
Add the confectioners' sugar and vanilla and beat until smooth. Be careful not to overbeat the filling, or it will lose structure. (The filling can be made one day ahead. Cover the bowl tightly and put it in the refrigerator. Let the filling soften at room temperature before using.)
Assembling the Whoopie Pies: Turn half of the cooled cookies upside down (flat side facing up).
Use an ice cream scoop or a tablespoon to drop a large dollop of filling onto the flat side of the cookie. Place another cookie, flat side down, on top of the filling. Press down slightly so that the filling spreads to the edges of the cookie. Repeat until all the cookies are used. Put the whooopie pies in the refrigerator for about 30 minutes to firm up before serving.
The whoopie pies will keep for up to 3 days, on a parchment-lined baking sheet covered with plastic wrap, in the refrigerator.
Baked Note: Make sure you chill the pumpkin puree thoroughly before making this recipe. The chilled puree will make your whoopie pies easier to scoop.
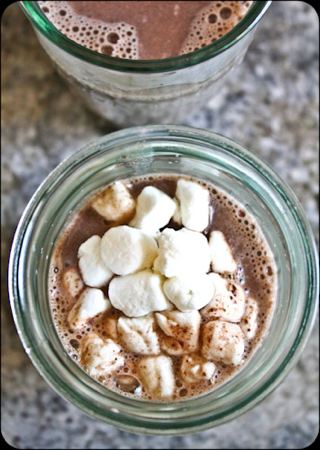
Nutella Hot Chocolate (Courtesy of Real Mom Kitchen)
- 4 cups whole milk
- 1/2 cup Nutella
- mini marshmallows or whipped cream
In a medium sauce pan over medium-low heat, whisk together milk and Nutella until the Nutella is melted and milk gets nice and warm. Serve in mugs and top with marshmallows or whipped cream. Makes 4 servings.
This can be made ahead of time, cooled, and stored in the fridge. Reheated on the stove or microwave in individual mugs. If microwaving, reheat each cup for about 1 minute.
Shades of Pink: Newark's Cherry Blossom Festival and Raspberry Coulis

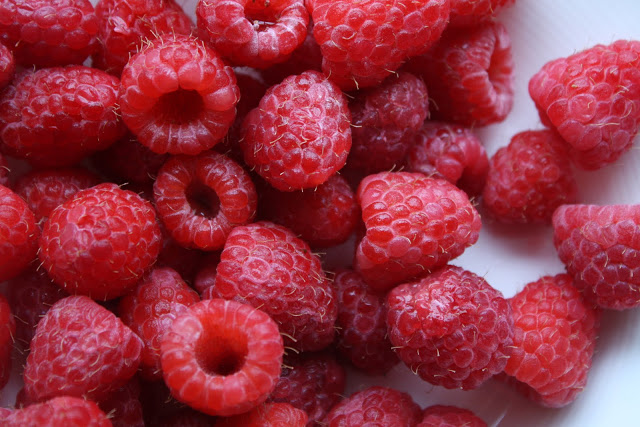
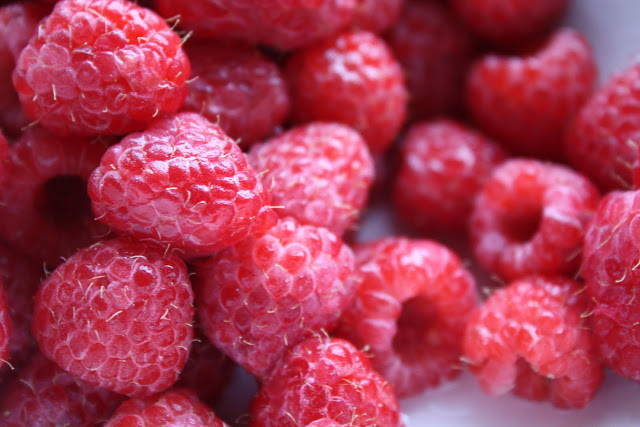
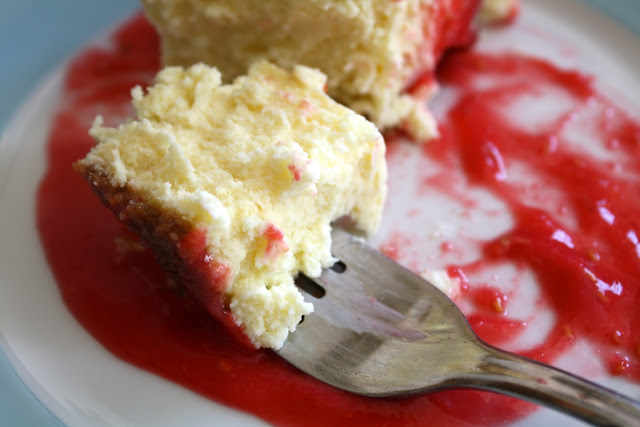
My 19 month-old son (Otis) is obsessed with a book called "Eye Like Colors." The pink page has flamingoes, cherry blossoms and raspberries (among other thing) and it gave me just the inspiration I needed for this post. Cherry blossom blooms were everywhere a few weeks ago and I saw the most awesome looking raspberries the other day. Pink (or a light shade of red) was the color of the day, so I bought a pint of fresh berries decided it would make the perfect coulis. Now what would go well with coulis?
It didn't take me long to remember that I made the best cheesecake I ever made a month ago. The recipe for Upstate Cheesecake from Brooklyn's Baked was a total hit and I was thinking about making it again anyway.
So, on a lovely afternoon while both boys (canine and human alike) took long naps, I started on the cheesecake. It's not difficult to make, but you do need to carve out a bit of time. After making the batter the cake bakes for 10 minutes at a high temperature. Then it bakes for another hour at a lower temperature. Next there is a slow temperature reduction which takes an hour with the oven heat turned off (the cake is left in the oven). This cheesecake doesn't require a lot of hands-on time but, like I said, you have to keep an eye on things and stay close to the oven.

Everything was going great until a bit of the oil I used to grease the spring-form pan started dripping down onto the oven floor. One thing led to another and smoke started to fill the room (I'm not totally sure how this happened). Our 'talking' fire alarm started screeching "Fire! Fire!" and all the sirens went off. Omar, the pooch, went berserk and I hopped up on my aqua blue rocking chair in an attempt to dismantle the fire alarm. Being almost 7 months pregnant, I don't exactly have the balance I used to and I got side swiped by a ferocious bout of vertigo. This led to a free-fall down to the floor, fire alarm in hand, and me yelling, "Otis, don't worry...mommy has this under control." Otis had woken up from his nap and he wasn't buying it.
Well, as it turns out, near kitchen catastrophes make the best dishes and the cheesecake came out perfectly...even with a cool down period that wasn't in the recipe's instructions and was done out of necessity (I had to cool down the oven and clean it quickly). The raspberry coulis was wonderful and very easy to make. My sieve wasn't fine enough so I did get some seeds, but it was still delicious.

What a wonderful time of year...

 |
| Otis with one of his most favorite cousins.... |
Raspberry Coulis (Courtesy of The Top Chef Cookbook, Contestant Hung Huynh)
Pair with Baked's Upstate Cheesecake
Ingredients
1 pint fresh raspberries
2 tablespoons granulated sugar, or to taste
1 tablespoon fresh lemon juice, or to taste
Directions
Put all the ingredients in a food processor and puree. Strain through a fine-mesh sieve, pushing down on the solids. Discard the seeds. Taste and add more sugar or lemon juice if needed. Cover and refrigerate until ready to serve.
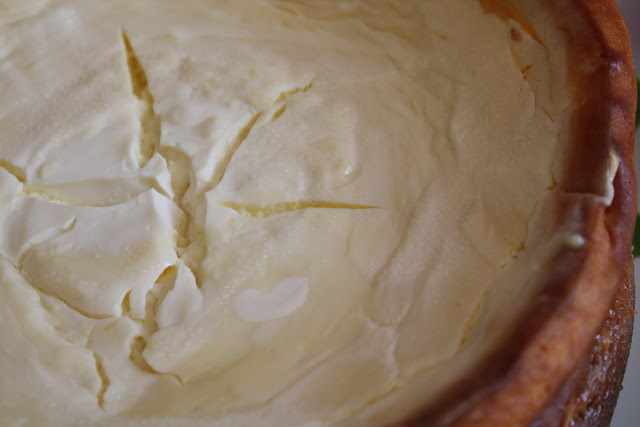
I didn't make the cake in a 'water bath' which is supposed to help minimize cracking. That said, the cracking doesn't change the taste...not one bit!
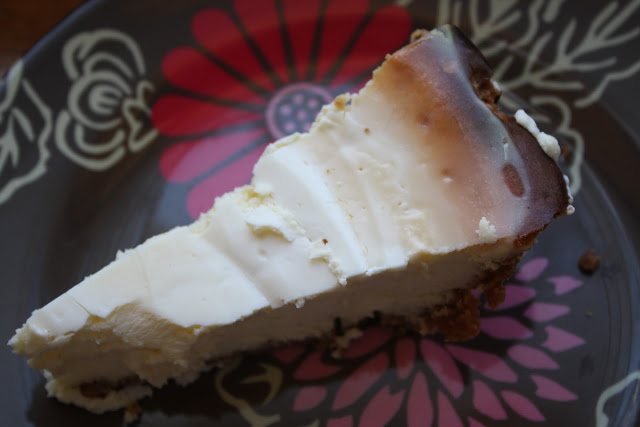
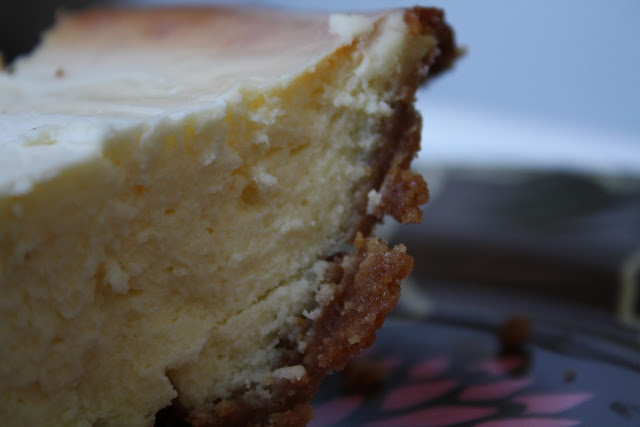
Baked Brooklyn's Absolutely Amazing Cheesecake
My insider's tip is that the best New York style cheesecake is in the Kingsbridge section of the Bronx, not far from where I grew up. S&S Cheesecake is hands down the most delicious cheesecake you can buy on the open market. Their factory doesn't have the most convenient hours, but everyone "in the know" knows that you can get their classic cakes on 238th Street (in the Bronx), at the local bodegas right off Broadway.
This cake(recipe below), is my No. 2 pick. That's really saying something. The cheesecake is another out-of-this-world recipe from Baked, Brooklyn. It's thick, rich, and has a hint of lemony-citrus. The graham cracker crust is perfection and it was very easy to make.
This cheesecake requires a bit of time--not actual work time, but time to bake, cool and then refrigerate. You also need to get the cream cheese to room temperature. If it is too cold it will require excessive beating, which could add too much air to the mixture and lead to cracking (though this doesn't affect the taste). So my advice to you, make this the day before you want to eat it.
Upstate Cheesecake (Courtesy of Baked: New Frontiers in Baking)
Yields 1 cake (This is such a rich cake, you really only need a small slice. We got more than 12 servings out of this cake, but figure out your own portion-size preference based on a 9 inch cake.)
For the Simple Graham Crust
2 1/2 cups graham cracker crumbs (about 20 crackers in crumbs)
1/4 cup sugar
1/2 cup (1 stick) unsalted butter, softened
For the Cream Cheese Filling
40 ounces (five 8-ounce packages) cream cheese, softened
1 3/4 cups sugar
1 tablespoon all-purpose flour
1 tablespoon grated lemon zest (from about 1 lemon)
1/4 teaspoon fresh lemon juice
5 large eggs
2 large egg yolks
1/4 cup heavy cream
1/2 cup sour cream
Make the Simple Crust:
- Lightly spray a 9 inch springform pan with nonstick cooking spray. (I used my traditional 9 inch pie pan.)
- Put the graham cracker crumbs, sugar, and butter in a large bowl. Beat, by hand, until well combined. Press the mixture into the bottom and all the way up the sides of the prepared pan. Put in the refrigerator while you make the filling.
Make the Cream Cheese Filling:
- Preheat the oven to 500 degrees F.
- In the bowl of an electric mixer fitted with the paddle attachment, combine the cream cheese, sugar, flour, lemon zest and lemon juice. Beat on medium speed until just combined, being careful not to overbeat (too much air can cause the cheesecake to crack). Add the eggs and egg yolks, one at a time, beating well after each addition. Add the cream and beat until incorporated.
- Pour the mixture into the chilled crust and bake for 10 minutes. Open the oven door to let out some heat, and lower the oven temperature to 350 degrees F. Bake until the cheesecake is set around the outside, but still slightly wobbly in the center, 45 minutes to 1 hour, rotating the pan every 15 minutes. Remove from the oven and spread the sour cream over the top of the cheesecake. Return to the oven for 5 more minutes. Turn off the heat, crack the oven door, and let the cheesecake cool completely in the oven (about 1 hour).
- Chill the cheesecake in the refrigerator for 8 hours or overnight. When ready to serve, loosen the sides of the crust from the pan with an offset spatula, then remove the springform sides and serve. (I just cut a slice with a sharp knife and served!)
Brooklyn's Baked Brownies: A Bit of Chocolate Heaven
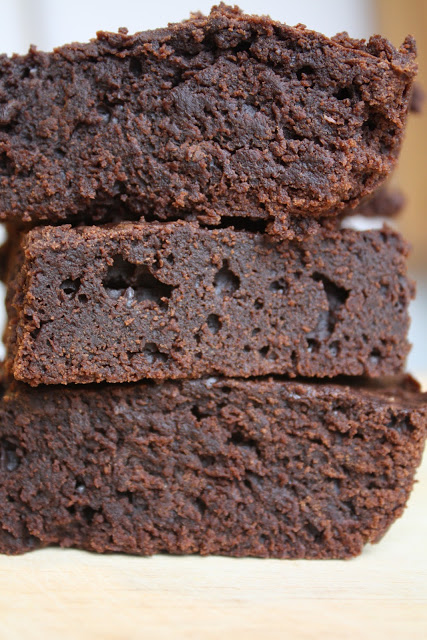
I used 68% cacao chocolate and followed the instructions to-a-T. Like everything else I have made from the Baked Bakery in Red Hook, Brooklyn (including Banana Espresso Chocolate Chip Muffins and Pumpkin-Chocolate Loaf) these hit the spot and made me forget that this winter has been...well, absolutely awful. So don't fret the 16 degree weather and the non-stop snow that keeps you homebound. Just warm a brownie square in the oven and serve ala mode!
Be careful not to over-bake, under-bake or over-mix.
Now say it with me, "If it's good enough for Oprah, it's good enough for me!"
Baked Brownies (Courtesy of Baked: Matt Lewis and Renato Poliafito)
Ingredients
1¼ cups all-purpose flour
1 teaspoon salt
2 tablespoons dark unsweetened cocoa powder
11 ounces dark chocolate (60 to 72 percent cacao), coarsely chopped
1 cup (two sticks) unsalted butter, cut into one-inch pieces
1 teaspoon instant espresso powder
1½ cups granulated sugar
½ cup firmly packed light brown sugar
5 large eggs, room temperature
2 teaspoons vanilla extract
Directions
- Preheat the oven to 350 degrees. Butter the sides and bottom of a 9×13-inch glass or light-colored metal baking pan.
- In a medium bowl, whisk together the flour, salt and cocoa powder. Put the chocolate, butter, and instant espresso powder in a large bowl and set it over a saucepan of simmering water, stirring occasionally, until the chocolate and butter are completely melted and smooth. Turn off the heat, but keep the bowl over the water and add the sugars. Whisk until completely combined, then remove the bowl from the pan. The mixture should be at room temperature.
- Add three eggs to the chocolate mixture and whisk until combined. Add the remaining eggs and whisk until combined. Add the vanilla and stir until combined. Do not overbeat or your brownies will be cakey.
- Sprinkle the flour mixture over the chocolate mixture. Using a spatula (not a whisk), fold the flour mixture into the chocolate until just a bit of the flour mixture is visible.
- Pour the batter into the prepared pan and smooth the top. Bake in the center of the oven for 30 minutes, rotating the pan halfway through. The brownies are done when a toothpick inserted into the center comes out with a few moist crumbs sticking to it.
- Let the brownies cool completely, then cut them into squares and serve.
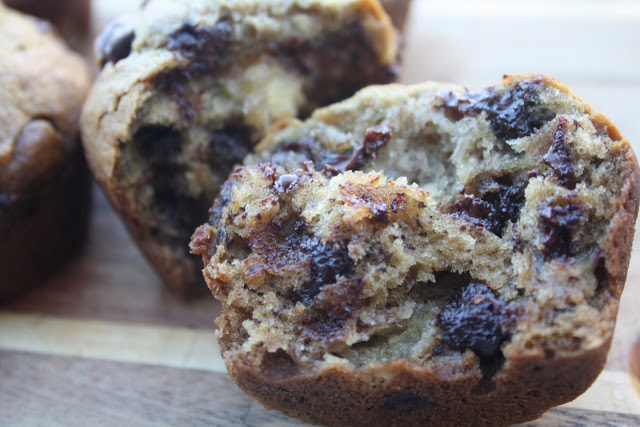
Banana Espresso Chocolate Chip Muffins
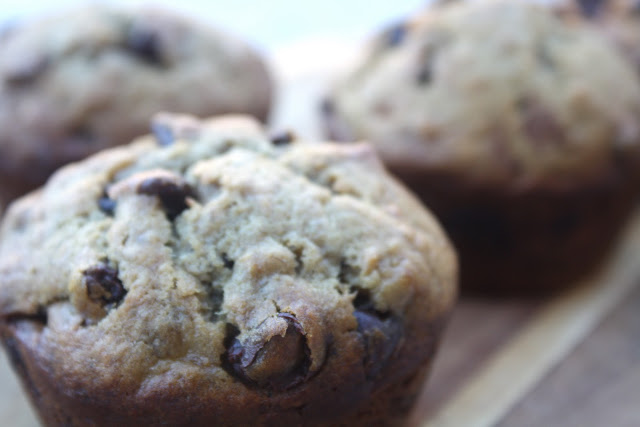
This recipe for Banana Espresso Chocolate Chip Muffins is from the Baked Cookbook (which I've mentioned quite a bit recently). These little treats are an excellent way to start your day and a great way to turn those over-ripe bananas into something more delicious than compost mush.
Note: Instant espresso powder is not the same as ground espresso - it dissolves instantly in hot water.
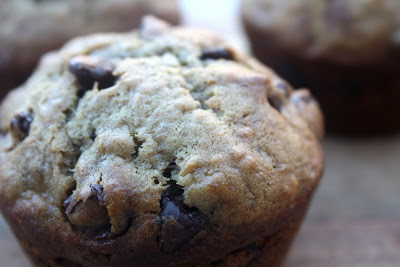
BANANA ESPRESSO CHOCOLATE CHIP MUFFINS (Courtesy of Baked)
1 1/2 cups mashed, very ripe bananas (about 4 medium bananas)
1/2 cup sugar
1/4 cup firmly packed light brown sugar
1/2 cup (1 stick) unsalted butter, melted
1/4 cup whole milk
1 large egg
1 1/2 cups all-purpose flour
1 teaspoon instant espresso powder
1 1/2 teaspoons baking soda
1 teaspoon salt
1 cup (6 ounces) semisweet chocolate chips (I usually go with Ghiradelli.)
Yield: 12 muffins (Halving the recipe is simple, except for the egg part...)
Directions
Preheat the oven to 350 degrees. Spray a 12-cup muffin pan with non-stick cooking spray. (I take a paper towel and use the remaining melted butter from the saucepan to grease the muffin pan.)
In a medium bowl, stir together bananas, sugar, butter, milk and egg.
In another medium bowl, whisk together the flour, instant espresso powder, baking soda and salt. Make a well in the middle of the dry ingredients. Pour the wet ingredients into the well and stir until just combined. Fold in the chocolate chips.
Fill each cup about three-quarters full. Bake in the center of the oven for 20 to 25 minutes, until a toothpick inserted in the center of a muffin comes out clean.
Move the muffin pan to the cooling rack, and let cool for 15 minutes. After 15 minutes, remove the muffins from the pan and let them finish cooling on the cooling rack.
Muffins can be stored in an airtight container for up to 2 days.
Enjoy!


I enjoy traveling, photography, hiking, street art, design, architecture, food trucks, gardening, the cosmos, cooking with the seasons, political activism and wallpaper! I know my interests span a variety of categories, here's where they all come together.

