When it was announced that the Yves Saint Laurent retrospective that wowed audiences at the Petit Palais in Paris two years ago would travel to Denver this week, and nowhere else in the United States, the question on many minds was: why Denver?
“America isn’t just New York or Los Angeles or Chicago or Boston,” said Pierre Bergé, Saint Laurent’s longtime partner in life and business and the head of the designer’s foundation. “Besides, Denver asked me. Voilà!” - New York Times, T Magazine, Blog
Looks like we moved out of Brooklyn and over to Denver at just the right time! I love museums-- permanent collections, special exhibits, retrospectives, Classical, Neo-Classical, the Classics, Abstract Expressionism, fashion, interiors and design, architecture...I love it all. So when I heard that the Denver Art Museum was the exclusive U.S. venue for the Yves St. Laurent retrospective, I was giddy with excitement. Positively giddy. G-I-D-D-Y.
 |
| The "Big Sweep" by Claes Oldenburg and Coosje van Bruggen, outside DAM. |

Feeling the spirit of YSL, I toyed with the idea of wearing a wool pants suit for my museum visit. But it was really warm that day so it didn't seem terribly practical to be donning wool. Well that, and I was heading over to the exhibit straight from the kid's playground. So there I was, at the museum's biggest fashion event, dressed rather unfashionably. But who cares, right? I was there! Yes, I was there, enjoying the exhibit, for over two hours, sans children.
There is no photography allowed inside the venue, so you will have to take my word on this-- the retrospective was wonderful. Magnificent, really. The presentation, curation and collection were impeccable. I may have to go back one more time...
Now it doesn't take much for me to get in touch with my inner Francophile, so in honor of Yves, I decided to make two quiches this week. And get this-- I made the dough too. Oh yes. Mais oui! I rolled out some pâte brisée, which literally means "short pastry." And I did it twice. Turns out that making tart dough isn't difficult at all, you just have to be mindful that it needs to chill for three hours before you can actually use it.
I decided to go with a spinach quiche (originally from Bon Appetit Magazine) and a mustard tart (from Dorie Greenspan's tome, Around My French Table). I followed Dorie's recipe for pâte brisée as well.
I decided to parbake both crusts for 20 minutes, with oiled foil on top (more on this below), and then let the pies bake an additional 2 minutes once the foil was removed. In retrospect, I should have let them bake a few minutes longer. I think the crust would have been a bit more flaky. That said, all in all, it was a very successful (first!) attempt at making homemade quiche.
So here they are. I hope you enjoy the recipes. And if you find yourself in Denver before July 8th, definitely visit the Denver Art Museum's retrospective on YSL.
I'm off to channel Catherine Deneuve...and hoping that Netflix delivers Belle De Jour lickety-split.
Au revoir!
Pâte Brisée/ Tart Dough (Courtesy of Dorie Greenspan, Around My French Table)
Yield: Makes one 9 - to 9 ½-inch tart shell
Be prepared: The dough should chill for at least 3 hours.
Ingredients
1 1/4 cups all-purpose flour
1 teaspoon sugar
1/2 teaspoon salt
6 tablespoons (3/4 stick) very cold (or frozen) unsalted butter, cut into bits
1 large egg
1 teaspoon ice water

 To make the dough by hand: Put the flour, sugar, and salt in a large bowl. Drop in the bits of butter and, using your hands or a pastry blender, work the butter into the flour until it is evenly distributed. You’ll have large and small butter bits, and that’s fine — uniformity isn’t a virtue here. Beat the egg and water together, drizzle over the dough, and, using a fork, toss the dough until it is evenly moistened. Reach into the bowl and, using your fingertips, mix and knead the dough until it comes together. Turn it out onto a work surface, gather it into a ball (if the dough doesn’t come together easily, push it, a few spoonfuls at a time, under the heel of your hand or knead it some more), and flatten it into a disk.

Chill the dough for at least 3 hours. (The dough can be refrigerated for up to 5 days.)
When you’re ready to make the tart shell, butter a 9- to 9 1/2-inch fluted tart pan with a removable bottom (butter it even if it’s nonstick).
To roll out the dough: I like to roll out the dough between sheets of wax paper or plastic wrap or in a lightly floured rolling cover, but you can roll it out on a lightly floured work surface. If you’re working between sheets of paper or plastic wrap, lift the paper or plastic often so that it doesn’t roll into the dough, and turn the dough over frequently. If you’re just rolling on the counter, make sure to lift and turn the dough and reflour the counter often. The rolled-out dough should be about ¼ inch thick and at least 12 inches in diameter.
Transfer the dough to the tart pan, easing it into the pan without stretching it. (What you stretch now will shrink in the oven later.) Press the dough against the bottom and up the sides of the pan. If you’d like to reinforce the sides of the crust, you can fold some of the excess dough over, so that you have a double thickness around the sides. Using the back of a table knife, trim the dough even with the top of the pan. Prick the base of the crust in several places with a fork.

Chill — or freeze — the dough for at least 1 hour before baking.
Center a rack in the oven and preheat the oven to 400 degrees. Press a piece of buttered foil (or use nonstick foil) against the crust’s surface. If you’d like, you can fill the covered crust with rice or dried beans (which will be inedible after this but can be used for baking for months to come) to keep the dough flat, but this isn’t really necessary if the crust is well chilled. Line a baking sheet with a silicone baking mat or parchment paper and put the tart pan on the sheet.

To partially bake the crust: Bake for 20 minutes, then very carefully remove the foil (with the rice or beans). Return the crust to the oven and bake for another 3 to 5 minutes, or until it is lightly golden. Transfer the baking sheet to a cooling rack and allow the crust to cool before you fill it.
To fully bake the crust: Bake for an additional 10 minutes, or until it is an even golden brown. Transfer the baking sheet to a cooling rack and allow the crust to cool before you fill it.
Storing: Well wrapped, the dough can be kept in the refrigerator for up to 5 days or frozen for up to 1 month. Although the fully baked crust can be wrapped airtight and frozen for up to 2 months, I prefer to freeze the unbaked crust in the pan and bake it directly from the freezer — it has a fresher flavor. Just add about 5 minutes or so to the baking time.


Ingredients
3 carrots (not too fat), trimmed and peeled
3 thin leeks, white and light green parts only, cut lengthwise in half and washed
2 rosemary sprigs
3 large eggs
6 tablespoons crème fraîche or heavy cream
2 tablespoons Dijon mustard, or to taste
2 tablespoons grainy mustard, preferably French, or to taste
Salt, preferably fleur de sel, and freshly ground white pepper
1 9- to 9½-inch tart shell made from Tart Dough (recipe above), partially baked and cooled
Method
Center a rack in the oven and preheat the oven to 425 degrees. Line a baking sheet with a silicone baking mat or parchment paper.


Yield: Makes one 9 - to 9 ½-inch tart shell
Be prepared: The dough should chill for at least 3 hours.
Ingredients
1 1/4 cups all-purpose flour
1 teaspoon sugar
1/2 teaspoon salt
6 tablespoons (3/4 stick) very cold (or frozen) unsalted butter, cut into bits
1 large egg
1 teaspoon ice water
Method
To make the dough in a food processor: Put the flour, sugar and salt in the processor and whir a few times to blend. Scatter the bits of butter over the flour and pulse several times, until the butter is coarsely mixed into the flour. Beat the egg with the ice water and pour it into the bowl in 3 small additions, whirring after each one. (Don’t overdo it — the dough shouldn’t form a ball or ride on the blade.) You’ll have a moist, malleable dough that will hold together when pinched. Turn the dough out onto a work surface, gather it into a ball (if the dough doesn’t come together easily, push it, a few spoonfuls at a time, under the heel of your hand or knead it lightly), and flatten it into a disk.
To make the dough in a food processor: Put the flour, sugar and salt in the processor and whir a few times to blend. Scatter the bits of butter over the flour and pulse several times, until the butter is coarsely mixed into the flour. Beat the egg with the ice water and pour it into the bowl in 3 small additions, whirring after each one. (Don’t overdo it — the dough shouldn’t form a ball or ride on the blade.) You’ll have a moist, malleable dough that will hold together when pinched. Turn the dough out onto a work surface, gather it into a ball (if the dough doesn’t come together easily, push it, a few spoonfuls at a time, under the heel of your hand or knead it lightly), and flatten it into a disk.
To make the dough by hand: Put the flour, sugar, and salt in a large bowl. Drop in the bits of butter and, using your hands or a pastry blender, work the butter into the flour until it is evenly distributed. You’ll have large and small butter bits, and that’s fine — uniformity isn’t a virtue here. Beat the egg and water together, drizzle over the dough, and, using a fork, toss the dough until it is evenly moistened. Reach into the bowl and, using your fingertips, mix and knead the dough until it comes together. Turn it out onto a work surface, gather it into a ball (if the dough doesn’t come together easily, push it, a few spoonfuls at a time, under the heel of your hand or knead it some more), and flatten it into a disk. Chill the dough for at least 3 hours. (The dough can be refrigerated for up to 5 days.)
When you’re ready to make the tart shell, butter a 9- to 9 1/2-inch fluted tart pan with a removable bottom (butter it even if it’s nonstick).
To roll out the dough: I like to roll out the dough between sheets of wax paper or plastic wrap or in a lightly floured rolling cover, but you can roll it out on a lightly floured work surface. If you’re working between sheets of paper or plastic wrap, lift the paper or plastic often so that it doesn’t roll into the dough, and turn the dough over frequently. If you’re just rolling on the counter, make sure to lift and turn the dough and reflour the counter often. The rolled-out dough should be about ¼ inch thick and at least 12 inches in diameter.
Transfer the dough to the tart pan, easing it into the pan without stretching it. (What you stretch now will shrink in the oven later.) Press the dough against the bottom and up the sides of the pan. If you’d like to reinforce the sides of the crust, you can fold some of the excess dough over, so that you have a double thickness around the sides. Using the back of a table knife, trim the dough even with the top of the pan. Prick the base of the crust in several places with a fork.
Chill — or freeze — the dough for at least 1 hour before baking.
Center a rack in the oven and preheat the oven to 400 degrees. Press a piece of buttered foil (or use nonstick foil) against the crust’s surface. If you’d like, you can fill the covered crust with rice or dried beans (which will be inedible after this but can be used for baking for months to come) to keep the dough flat, but this isn’t really necessary if the crust is well chilled. Line a baking sheet with a silicone baking mat or parchment paper and put the tart pan on the sheet.
To partially bake the crust: Bake for 20 minutes, then very carefully remove the foil (with the rice or beans). Return the crust to the oven and bake for another 3 to 5 minutes, or until it is lightly golden. Transfer the baking sheet to a cooling rack and allow the crust to cool before you fill it.
To fully bake the crust: Bake for an additional 10 minutes, or until it is an even golden brown. Transfer the baking sheet to a cooling rack and allow the crust to cool before you fill it.
Storing: Well wrapped, the dough can be kept in the refrigerator for up to 5 days or frozen for up to 1 month. Although the fully baked crust can be wrapped airtight and frozen for up to 2 months, I prefer to freeze the unbaked crust in the pan and bake it directly from the freezer — it has a fresher flavor. Just add about 5 minutes or so to the baking time.
* * *
Gérard’s Mustard Tart (Courtesy of Dorie Greenspan, Printed in The New York Times, Diner's Journal)
Be sure to use strong mustard from Dijon. Dorie's friend Gérard Jeannin uses Dijon’s two most popular mustards in his tart: smooth, known around the world as Dijon, and grainy or old-fashioned, known in France as “à l’ancienne.” You can use either one or the other, or you can adjust the proportions to match your taste, but whatever you do, make sure your mustard is fresh, bright colored, and powerfully fragrant. Do what Gérard would do: smell it first. If it just about brings tears to your eyes, it’s fresh enough for this tart.Ingredients
3 carrots (not too fat), trimmed and peeled
3 thin leeks, white and light green parts only, cut lengthwise in half and washed
2 rosemary sprigs
3 large eggs
6 tablespoons crème fraîche or heavy cream
2 tablespoons Dijon mustard, or to taste
2 tablespoons grainy mustard, preferably French, or to taste
Salt, preferably fleur de sel, and freshly ground white pepper
1 9- to 9½-inch tart shell made from Tart Dough (recipe above), partially baked and cooled
Method
Center a rack in the oven and preheat the oven to 425 degrees. Line a baking sheet with a silicone baking mat or parchment paper.
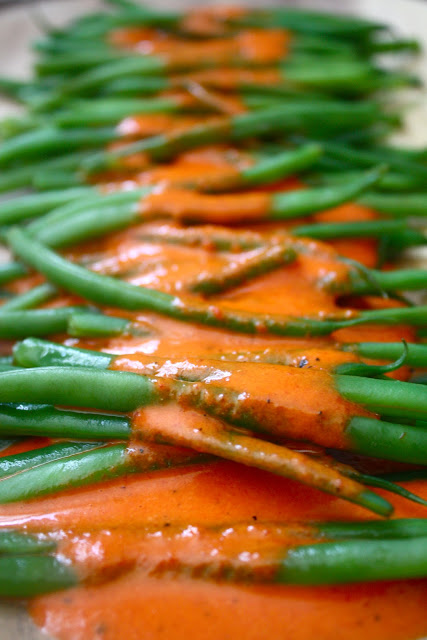
Cut the carrots and leeks into slender bâtons or sticks: First cut the carrots lengthwise in half, then place the halves cut side down on the cutting board and cut crosswise in half or cut into chunks about 3 inches long. Cut the pieces into 1/ 8- to 1/4-inch-thick matchsticks. If your carrots were fat and you think your matchsticks don’t look svelte enough, cut them lengthwise in half. Cut the leeks in the same way.
Fit a steamer basket into a saucepan. Pour in enough water to come almost up to the steamer, cover, and bring to a boil. Drop the carrots, leeks, and 1 rosemary sprig into the basket, cover, and steam until the vegetables are tender enough to be pierced easily with the tip of a knife, 10 to 15 minutes. Drain the vegetables and pat them dry; discard the rosemary sprig.
In a medium bowl, whisk the eggs together with the crème fraîche or heavy cream. Add the mustards, season with salt and white pepper — mustard has a tendency to be salty, so proceed accordingly — and whisk to blend. Taste and see if you want to add a little more of one or the other mustards.
Put the tart pan on the lined baking sheet and pour the filling into the crust. Arrange the vegetables over the filling — they can go in any which way, but they’re attractive arranged in spokes coming out from the center of the tart. Top with the remaining rosemary sprig and give the vegetables a sprinkling of salt and a couple of turns of the pepper mill.
Bake the tart for about 30 minutes, or until it is uniformly puffed and lightly browned here and there and a knife inserted into the center of the custard comes out clean. Transfer the tart to a cooling rack and let it rest for 5 minutes before removing the sides of the pan.
Serve hot, warm, or at room temperature (or lightly chilled).
Serving: The tart is delicious just out of the oven, warm, at room temperature, or even slightly chilled — although that wouldn’t be Gérard’s preference, I’m sure. If you’re serving it as a starter, cut it into 6 portions; if it’s the main event, serve it with a lightly dressed small salad.
Storing: Like all tarts, this is best soon after it is made, but leftovers can be covered, chilled, and nibbled on the next day.
* * *
Spinach Quiche (Courtesy of Bon Appetit Magazine and Smitten Kitchen, with a modification or two...)
Ingredients
4 ounces of cream cheese, room temperature
4 ounces of cream cheese, room temperature
1/2 cup half and half (or milk)
3 eggs
1 10-ounce package frozen chopped spinach, thawed and drained
1/2 cup grated cheddar (you could use Gruyere too)
1/4 cup grated Parmesan
3 green onions, thinly sliced
1/4 teaspoon salt
1/4 teaspoon pepper
Preheat oven to 425°. Beat cream cheese in medium bowl until smooth. Gradually beat in half and half and eggs. Mix in remaining ingredients. Pour mixture into prepared crust. Bake until crust is golden brown and filling is set, about 25 minutes. Cool 10 minutes before serving.
Preheat oven to 425°. Beat cream cheese in medium bowl until smooth. Gradually beat in half and half and eggs. Mix in remaining ingredients. Pour mixture into prepared crust. Bake until crust is golden brown and filling is set, about 25 minutes. Cool 10 minutes before serving.