
Your Custom Text Here
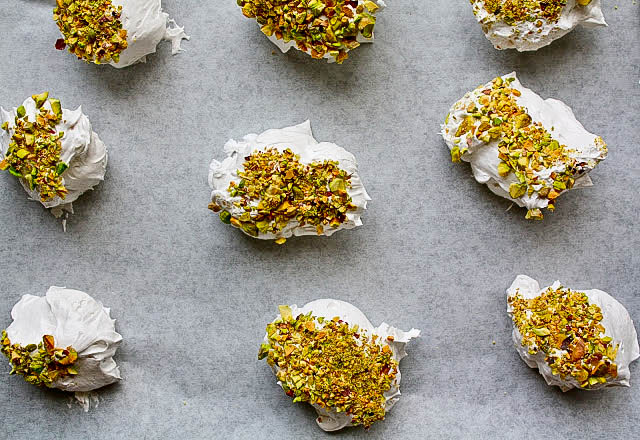
Pistachio-Rosewater Meringues (and another year on Earth)
I'm hooked on the (relatively new and critically
acclaimed) HBO show Girls.
The younger-me identifies with the show's main character who lives a
post-college life in New York City and grapples with life's ebbs and
flows, self-doubt, job insecurity and budget crunching. And while the show
takes me down memory lane just a bit, as I watch it I find myself being
thankful that I am, in fact, a little bit older. I occasionally grumble about
moving out of the 25-34 age demographic, but I wouldn't want to go back (not
that you can anyway). I like this station of life.
I've thought long and hard about my politics and core beliefs. I've
considered (at great lengths) what's important to me and what really isn't
a priority anymore. I've re-evaluated and re-assessed. Emotional stability and
self-confidence, which eluded me somewhat in my twenties, I've been able to
find in my mid-(ahem, late) thirties.
I'll admit that every now and again I'm stuck by the desire to
hunt down some one from my past and shout out, "Hey, remember me? I'm
not a mess anymore! I've got it together! I'm an adult!" But those moments
are few and far between, as I'm not looking for anyone's validation in the way
that I might have been a decade ago. That's the benefit of age.
Which brings me to my birthday meringues...
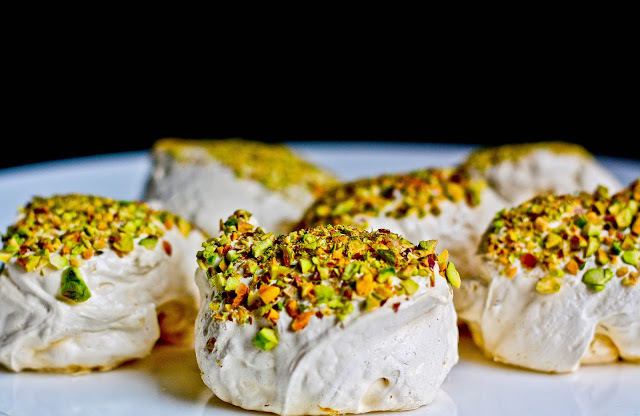
I first tasted these Pistachio-Rosewater Meringues at a dinner
party a few years ago. My friend Yana had us over for an
Ottolenghi-Middle-Eastern-inspired feast. The meal was spectacular and it was
capped off by these little beauties: sweet, light, delicate and delicious,
meringues.
I'd always wanted to make them at home, but I didn't know the
first thing about baking. And I was certain that I would mess them up if I even
tried. So I never did.
But several years have passed and I'm a bit older and a bit
wiser. I'm also fairly confident in the kitchen. When I saw rosewater
at my local market, I decided to pick up a bottle. I
knew then and there that those
meringues were getting made in the not-so-distant future.
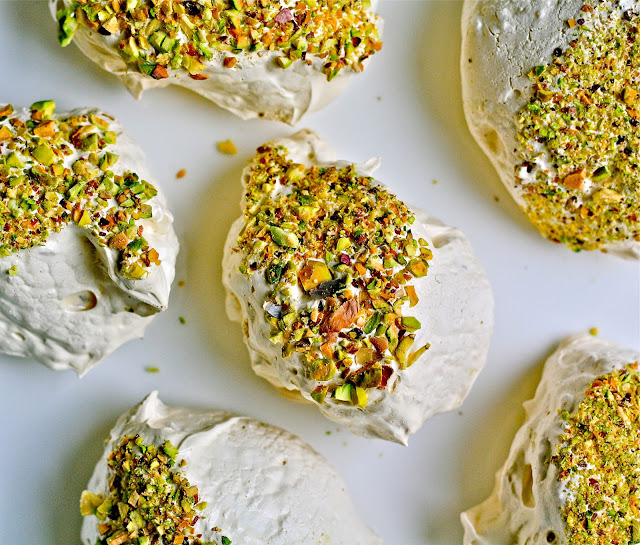
I made them last night and they came out perfectly. I also
discovered that while they might appear challenging to make, the ingredients
are simple and the preparation is straight-forward.
My take-way from the meringue success, and using it as a
metaphor for the next year of my life, is this: Have the confidence to try new
things and don't let prospect of failure stop
you in your tracks. You've got it together. You know who are. That is the gift
of age. Enjoy it and happy birthday (to me).

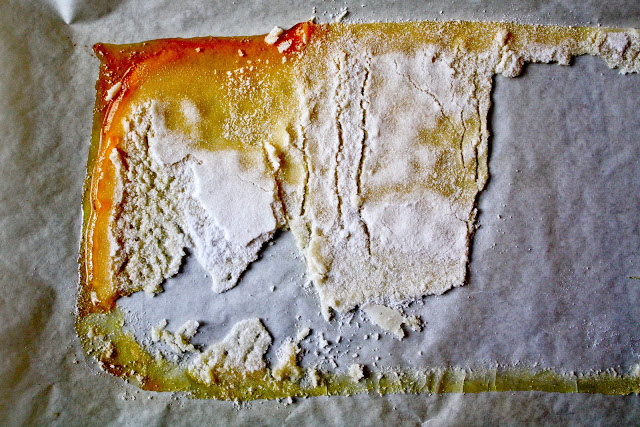
The sugar began to caramelize pretty quickly, so I had to start
again. I've since learned from a CCN
contributor that Denverites (or those cooking at altitude) should use a
thermometer and heat the oven 10 degrees lower than the suggested temperature,
as Denver's boiling temperature is 10 degrees lower than what you'll find at
sea level.


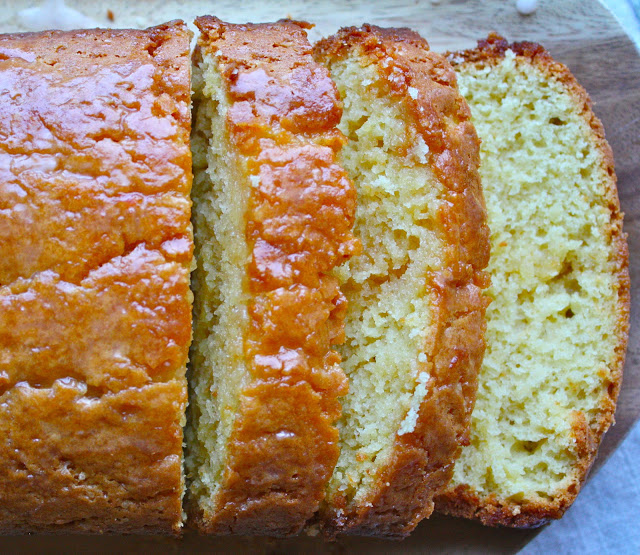
Pistachio-Rosewater Meringues
Inspiration and combination from Yotam Ottolenghi's eponymous
cookbook, Ottolenghi.
With some adaptions from the Joy of Baking and the Guardian UK.
See additional links below.
Yields 12-16
Ingredients
1 cup of granulated sugar (I used white, not
caster)
4 egg whites (Cold eggs are easier to
separate. Once they are separated, cover the egg whites and let them come
to room temperature before using, about 30 minutes.)
*In general, the ratio for meringues is 1/4 cup of sugar/per egg
white.
1 1/4 teaspoons of rosewater or orange blossom
water
A big handful of pistachio nuts, finely chopped
(about 1/4 cup)
Preparation
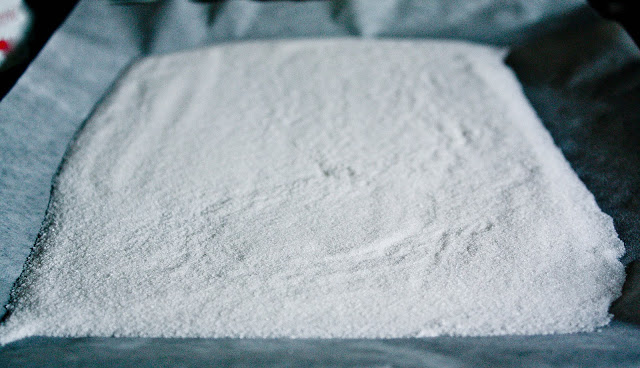
1. Preheat the oven to 400F. Spread the sugar
evenly over a baking tray lined with parchment paper. Put the tray in the oven
for 8 minutes or until the sugar is hot and starting to dissolve at edges, but
not caramelized. (See photo note above if you live in Denver.)
2. While the sugar is in oven, put the egg whites
in bowl of an electric mixer fitted with a whisk. When sugar is almost ready,
turn mixer on high and let it work for a minute or until the egg whites start
to froth.
3. Carefully pour the sugar into the whisked
whites (I used the parchment paper as a funnel and poured the sugar in that
way). Add the rosewater (or orange blossom water) and continue whisking on high
for 10 minutes or until the meringue is beautifully smooth, and holds a shape.
4. Reduce the oven temperature to 225F** Important
step.
5. Line a baking tray or two with parchment paper
(the one you just used for the sugar is fine). And spread the pistachios on a
board and finely chop them.
6. Get two big kitchen spoons.
Use one spoon to scoop up a big ball of the meringue, and use the other spoon
to scrape it off and gently roll the ball into the pistachios. Place the meringues nuts-up on the baking tray. Repeat this
step.
7. Place the meringues in the oven and bake for 2
hours. Rotate the baking sheet every 1/2 hour. Check to see if they're done.
They should be dry on the outside and soft on the inside.
Store the meringues in a dry place at room
temperature.
Note: Some recipes suggest that you leave the meringues in the oven
for another 4 hours--with the temperature off (this is after the initial 2
hours of baking is complete). I didn't do this (I baked them for 2 hours at
225F) and I thought the texture was spot-on.

I came across this Guardian
link on "How to Make
Perfect Meringues" which offers up some more guidance on all
things meringue.
The Daily Dish/LA Times weighs in
on the subject.
And some notes from The Joy
of Baking (though I didn't
use cream of tartar):
There are a few things to keep in mind when making meringue
cookies. The standard ratio when making hard meringues is 1/4 cup (50 grams) of
granulated white sugar for every egg white. This amount of sugar is needed to
give the meringue its crispness. Adding the sugar gradually to the egg whites
ensures that the sugar completely dissolves and does not produce a gritty
meringue. Cream of tartar is used in the whipping of egg whites to stabilize
them and allows them to reach maximum volume. Also, it is a good idea to use
parchment paper or aluminum foil to line your baking sheets, not wax paper, as
the meringue will sometimes stick to wax paper.
Baking the meringues in a slow
oven allows for gradual evaporation of the moisture from the meringues. If the
oven temperature is too high, the outside of the meringue will dry and set too
quickly. You will also notice that the outside of the meringue separates from
the inside. Another indicator that your oven is too high is when the meringue
starts to brown which causes the sugar to caramelize. If this happens, lower
the temperature about 25 degrees F. If you decide to make meringues on a rainy
or humid day, you will probably have to bake the meringues longer (could be up
to 30 minutes more) than on a dry day. Lastly, to prevent cracking of the
meringues, do not open the oven door during the first half of the baking time.
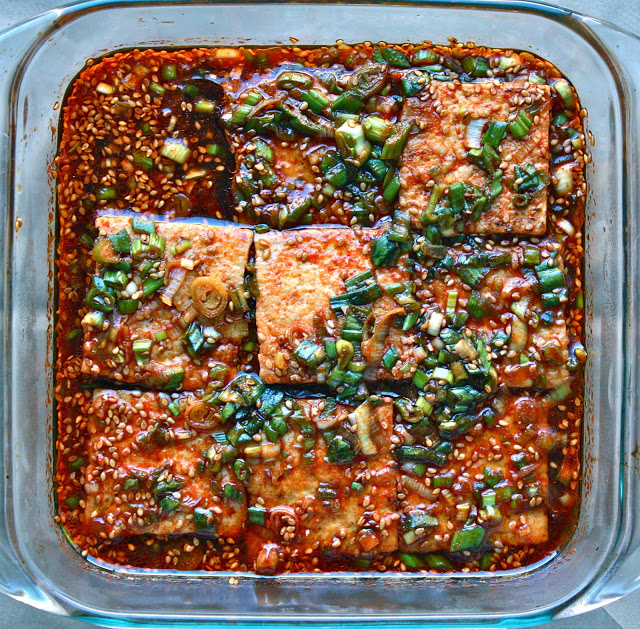
H-Mart In Instagram and Dubu Jorim (Korean Braised Tofu)
The new year has brought new things. Otis, my spunky 3-year-old, is now in pre-school for the first time. We got a lucky break because the class had been full, but one little boy had to leave and we slid right into his spot. I was nervous about how Otis would react on his first day (and I was feeling pretty emotional about the change too). But when we walked into the classroom, Otis saw the appropriately-sized tables and chairs, the books and the trains. He turned to me and said, "This room looks great, mommy. It's going to be a wonderful day." He had a serious case of perma-smile when he found out that music, MLK-friendship-hand-painting and swimming was in store for him too. And that was that. No tears, no meltdowns, no drama.
I chatted with his teachers for a few minutes and when I turned around, Otis was having a very intense discussion with another classmate about train track construction and switching points on the line (he knows a lot about trains). I waved goodbye, picked up Theodore (the 17-month-old), walked outside, and got into the car. Then I did what any mother would do on her son's first day of preschool. I went to H-Mart.


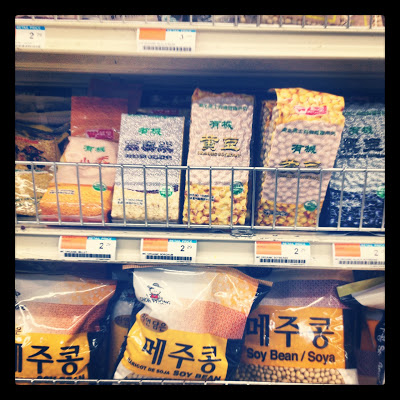
Our local H-Mart also has an amazing organic tofu stand, where tofu is made fresh daily (there's silky sliced, fried, and firm block). I picked up a 2-block tray and it was still warm. Like I said, it's the real deal and it's fresh.


Dubu Jorim is a very popular dish in Korea and often packed for school lunches with a few other side dishes and some rice. And that's kinda perfect since Otis started school this week. I think a Korean-style meal box (dosirak) is definitely in his future.
Dubu Jorim: Traditional Korean Braised Tofu
(Adapted ever-so-slightly from Blogging Over Thyme)
2 lbs. block of tofu will serve 4 (with rice) or 2 very hungry people.
Marinade: Yields roughly 2 cups
Serve chilled
The ingredients are simple and the preparation is straight-forward. This recipe marinates the tofu for 6-8 hours, which allows the flavors to meld together (in the most delicious way). But other methods serve the braised tofu immediately, with the sauce spooned right on top. Be sure to use authentic, finely ground Korean red pepper (which is widely available at Asian supermarkets).
Ingredients
1/2 cup soy sauce
3/4 cup water
1 tablespoon Korean red pepper powder (finely ground)
1 tablespoon dark brown sugar
1 tablespoon vegetable oil
1 teaspoon toasted sesame oil
3/4 cup scallions, sliced
1 teaspoon lime juice
1/8 cup toasted sesame seeds
Preparation
Combine all the ingredients in small bowl and let them sit for 10-15 minutes (while you prepare and braised the tofu).
Pan-Fried Tofu
2 blocks of firm tofu, sliced into thin rectangles (about 1/2- inch in thickness)
vegetable oil
Slice the tofu into thin rectangles and then pat them dry with a paper towel.
Heat a large non-stick skillet over medium heat with a few tablespoon of vegetable oil (until there is a layer of oil coating the pan). Once the pan is hot, add the tofu, spreading it out in the pan so that the pieces are not touching each other. (It will take more than one round to get all the tofu braised). The tofu should sizzle when it hits the pan.
Sear tofu on each side for roughly 3-4 minutes, until it's light brown on both sides. Remove the tofu and place it on a paper-towel lined plate to absorb any excess oil. Repeat until all the tofu is seared. Allow the tofu to cool to room temperature.
Place the tofu on a baking dish, or any other container with a large surface area (and relatively high sides)--you can do this in two layers, if necessary. Pour the marinade over the tofu, cover, and refrigerate for roughly 6-8 hours. Turn the tofu once or twice during this time, so that all of the piece get marinated properly.
Best served chilled by itself, or with some sushi rice.

Winter Citrus: Deb's Grapefruit Olive Oil Pound Cake and Ina's Lemon Yogurt Pound Cake (plus trial-and-error baking at altitude)

I'll be honest, I'm glad 2012 is over. Though there were some pretty
spectacular moments, there was a good deal of stress and heartache too. Our
nuclear family was separated for almost 7 months while my husband flew
back-and-forth between Denver and Brooklyn. And my father had a massive heart
attack at the end of the summer, just 3 days after visiting us in Colorado. There
were emergency flights back home, lots of tears and the fear of what would come
next but we survived. There were births, engagements, weddings and
promotions so it wasn't all bad, but there were some very tough at times and I'm
hoping that it's smooth sailing ahead with the trying times behind us.
Unfortunately 2012 wanted to have the last laugh. In the final and penultimate day(s) of the year, I got hit with the plague. And it left me feeling pretty crummy. Flu-like symptoms, sinus pressure, a pounding headache, and fever kept me in bed and under the covers. Our friend's New Year celebration was cancelled because they too were under the weather. So we spent a quiet New Year's Eve, watching the ball drop/fireworks on television and thinking about all the (hopefully) good things to come in the year ahead. Then I went back to bed.
Unfortunately 2012 wanted to have the last laugh. In the final and penultimate day(s) of the year, I got hit with the plague. And it left me feeling pretty crummy. Flu-like symptoms, sinus pressure, a pounding headache, and fever kept me in bed and under the covers. Our friend's New Year celebration was cancelled because they too were under the weather. So we spent a quiet New Year's Eve, watching the ball drop/fireworks on television and thinking about all the (hopefully) good things to come in the year ahead. Then I went back to bed.
I was feeling much better by January, 2nd and I was really back on my
feet by the 3rd, thanks in no small part to: 4 bowls of Pho, 3 bowls of
matzo ball soup, 2 boxes of Kleenex, 1 box of Sudafed, a handful of Ibuprofen
and some nighttime sleep aids. After all that, I was right as rain. Though my New Year's
resolutions aren't terribly ambitious or lengthy (send out postcards on a
regular basis, write down family recipes, learn to snow shoe, read short
stories, blog/internet stuff Monday through Friday-- take the weekends off, be
kind, channel the Dalai Lama, etc.), I added one thing to my list now that I am
post-plague. Namely, infuse my diet with lots of vitamin C. That brings me to
winter citrus and some really great pound cakes...
Most people probably think of summertime and lemonade when they
think of citrus. But there are a few varieties that pop with flavor over the
winter months, and while they aren't locally grown, they taste great because
they are seasonal. Meyer lemons, blood oranges, ruby red grapefruits, satsumas
and kumquats come to mind.
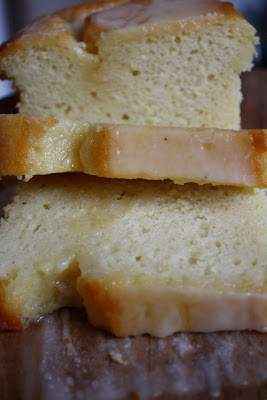
I've been making Ina's Classic
Lemon Yogurt Cake with Lemon Glaze for several years, and I
usually find myself craving it in the early winter months. There is something
about cake ingredients that include lemon, oil and glaze that work for me when
it's cold outside.
I'd thought about substituting grapefruit for lemon, but never
actually got around to experimenting. Then I saw Deb Perelman's Grapefruit
Olive Oil Pound Cake-- she'd done it! Her version is inspired by Ina's Lemon
Cake (see recipe way below) and Martha Stewart's rendition. Melissa Clark also
interpreted the now-famous cake, as have some great bloggers that I follow regularly. My point is this cake is making the rounds.

I made the grapefruit cake for our friends Beth and Philip, who
were in town visiting family over the holidays. They dropped by our house for
wine and dessert, and since they were coming over a bit later in the evening, I
thought a light citrus cake would do the trick.
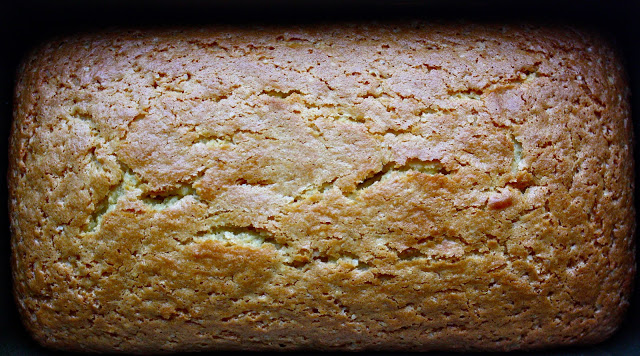
The cake tasted
great, but it looked rather sad. It basically collapsed right down the middle.
I've come to learn that pound cakes in particular, can take a beating at
altitude. So I posted my issue on the Culinary Content
Network FB page. The solutions came pouring in.
I now know that there is less atmospheric pressure the higher up
you go in elevation. Chef Tom
wrote, "What typically happens is your baked goods get over leavened,
meaning they rise faster than the wheat can hold the bubbles, and it falls. The
trick: reduce the amount of baking powder (I live at 5000 ft and reduce it by
half), and/or add 3 tbs flour per cake..." Another commenter told me to
"add a little water" and Ruth Tobias
directed me to this site.
When I made the cake the second time (but with only half the
glaze because I ran out of confectioners' sugar), it came out perfectly! I
subtracted 1/4 teaspoon of baking powder, put in an extra tablespoon of flour
and I added an extra tablespoon of both yogurt and olive oil. The verdict? It
tasted delicious AND it didn't sink. The pound cake had a perfect dome and I
was finally getting around those pesky altitude problems.
I decided to post Deb's recipe as it's written in her cookbook,
with my adaptations for altitude (and some changes I made on my second
go-around) in parenthesis.
Hope you enjoy both of these winter citrus cakes. Serve with a
side of tea and stay warm.
xo,
-Batya

Grapefruit Olive Oil Pound Cake
Adapted ever-so-slightly from Smitten Kitchen by Deb Perelman, and inspired
by A Good Appetite
by Melissa Clark.
Note: Most of my adaptations were made in order to compensate
for problems that can surface when you bake pound cake at high altitude (in my
case, Colorado). Increasing liquids and decreasing leavening agents are noted
in {parens}.
Yield: 1
loaf
Serves:
6-8 (Deb says 12. Not the case in our house.)
the Cake
Butter for pan
1 1/2 cups all-purpose flour {Altitude: I added 1 extra
tablespoon}
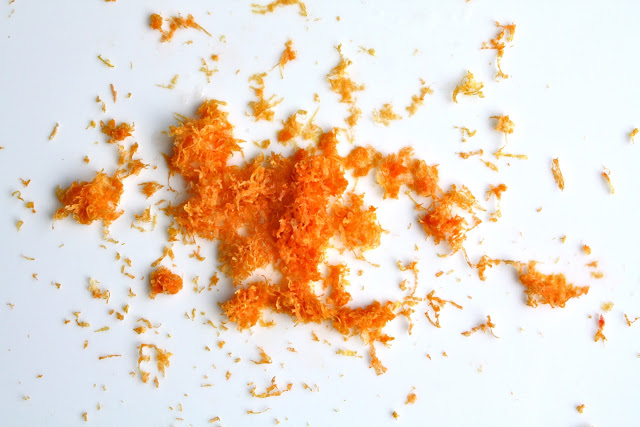
2 tablespoons freshly grated grapefruit zest, from 2 large
grapefruits
1/2 cup granulated sugar
1/2 cup raw or turbinado sugar (I use raw sugar in these Belgian Sugar Waffles. You can use granulated if you can't find the
raw variety)
1/2 cup olive oil {Altitude: I added 1 extra tablespoon}
2 large eggs at room temperature
1 teaspoon baking powder {Altitude: I reduced the baking powder
by 1/4 teaspoon}
1/4 teaspoon baking soda
1/2 teaspoon table salt
2 tablespoons freshly-squeezed grapefruit juice (I used ruby
red)
1/3 cup buttermilk or plain yogurt {I went with Noosa's Plain Yoghurt with Honey. It was
wonderful in this recipe. I've also made the cake with buttermilk. Both work
well. Add 1 extra tablespoon of buttermilk or yogurt, to compensate for
altitude. You could probably also add 1 teaspoon of honey.}
the Syrup
2 tablespoons granulated sugar
1/3 cup freshly-squeezed grapefruit juice
the Glaze
1 cup confectioners' sugar
2 tablespoons freshly-squeezed grapefruit juice
Pinch of salt

Preparations
make the cake: Heat the over to 350
degrees. Butter and flour a 9-by-5-inch loaf pan.
In a large bowl, rub the grapefruit zest into the sugars with
your fingertips. This will bruise it and help release as much grapefruit
essence as possible. Whisk in the oil until smooth. Add the eggs one at a time,
and whisk until combined. Scrape down the bowl.
Combine the flour, baking powder, baking soda, and salt in a
second bowl. In a liquid measuring cup, combine 2 tablespoons of
grapefruit juice and buttermilk/or yogurt. Add the flour and
buttermilk/or yogurt mixtures, alternating between them, to the oil-and-sugar
mixture, beginning and ending with flour.
Spread the batter in the pan, smooth the top, and rap the pan
on the counter a few times to ensure there are no air bubbles trapped. Bake for
45 minutes to 1 hour, until a cake tester comes out clean.
make the grapefruit syrup:
Combine 2 tablespoons of sugar with 1/3 cup grapefruit juice in a small
saucepan and cook over low heat until the sugar dissolves.

When the cake is finished, let it cool for 10 minutes in the
pan and then invert it onto a rack set over a tray. Poke holes in the cake with
a skewer or toothpick, then spoon or brush the grapefruit syrup over the cake.
Let the cake cool completely while it absorbs the syrup.
make the glaze: Combine the confectioners' sugar,
grapefruit juice, and pinch of salt in a bowl, whisking until smooth. Pour the
glaze over the top of cooled cake, and allow glaze to drizzle decoratively down
the sides.


* * *

Note: Follow the general guidelines for baking at altitude
stated above.
Cook Time: 50 min
Yield: 1 loaf
Ingredients
For the cake:
1 1/2 cups all-purpose flour
2 teaspoons baking powder
1/2
teaspoon kosher salt
1 cup plain whole-milk yogurt
1 1/3 cups sugar, divided
3
extra-large eggs
2 heaping teaspoons grated lemon zest (2 lemons)
1/2 teaspoon
pure vanilla extract
1/2 cup vegetable oil
1/3 cup freshly squeezed lemon
juice
For the glaze:
1 cup confectioners' sugar
2 tablespoons
freshly squeezed lemon juice
Directions
• Preheat
the oven to 350 degrees F. Grease an 8 1/2 by 4 1/4 by 2 1/2-inch loaf pan.
Line the bottom with parchment paper. Grease and flour the pan.
• Sift
together the flour, baking powder, and salt into 1 bowl. In another bowl, whisk
together the yogurt, 1 cup sugar, the eggs, lemon zest, and vanilla. Slowly whisk
the dry ingredients into the wet ingredients. With a rubber spatula, fold the
vegetable oil into the batter, making sure it's all incorporated. Pour the
batter into the prepared pan and bake for about 50 minutes, or until a cake
tester placed in the center of the loaf comes out clean.
• Meanwhile,
cook the 1/3 cup lemon juice and remaining 1/3 cup sugar in a small pan until
the sugar dissolves and the mixture is clear. Set aside.
• When
the cake is done, allow it to cool in the pan for 10 minutes. Carefully place
on a baking rack over a sheet pan. While the cake is still warm, pour the
lemon-sugar mixture over the cake and allow it to soak in. Cool.
For the glaze, combine the confectioners' sugar and lemon juice
and pour over the cake.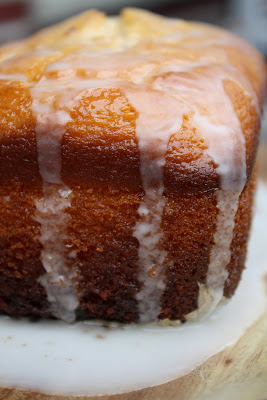
Gardens and Galettes (Butternut Squash with Caramelized Onion)

My original intention was to put together a little holiday gift post. But then I thought, "Good lord, do you know how many well-edited gift guides have already been posted?" Followed by "Do you know how unbelievably late in the season you are trying to put this together?" And "Don't you think that one of the best gifts you can bring your holiday host(ess)is the gift of food?"
So there you have it. A combination of intimidation, tardiness and rethinking caused me ditch my holiday gift guide idea. But had I included some cookbooks that you simply had to have, I would have included The Smitten Kitchen Cookbook.

I decided to make Deb's Butternut Squash and Caramelized Onion Galette which is on p. 99 of the book, though a scaled down version of it was previously posted on the Smitten Kitchen site about 5 years ago. The book recipe makes a much larger galette than I needed, so I decided to make a smaller version, which would still amply feed my family. It also allowed me to cut down on the incredible amount of butter needed for the larger galette crust (read: 16 tablespoons). Though I will admit, I firmly believe the holidays are about great friends, good wine, terrific conversation and lots of delicious food-- some of which contains a good deal of butter.
This galette, which is like a free-form rustic tart, takes a bit of time to make. So when the boys went down for their nap, I put on some Chet Baker (I'm really feeling him these days), made myself a little cocktail and got to work.

The recipe I posted is a hybrid of the book recipe, the blog recipe and this post from Seven Spoons. I had enough Fontina in my fridge to grate 1 cup, but if you don't have enough on hand good substitutes for Italian Fontina are Gruyere and Emmentaler (maybe even Asiago). If you are thinking about using Fontinella, don't (I almost made that mistake). This American-made, semi-hard, pasteurized cow's milk cheese is not related to Fontina at all. They are completely different, so don't use it here. I also opted for thyme instead of sage, though both would work in this galette.
The outcome was one down-right delicious meal. I have only one little caveat: don't rush the process. You really need to keep the dough in the fridge for at least an hour. Otherwise you'll end up with a bit of a mess once you start rolling it out.
Also, if you don't have a pastry blender (they are around $10), you can use a food processor to mix the dough. But be sure to use it on its lowest setting, and keep an eye on the texture-- you don't want to over-work the dough.
There's a bit of waiting time with this recipe but be patient, it's worth it. And if you bring it to a New Years Eve party, I'm pretty sure it'll be a hit!


 Butternut Squash and Caramelized Onion Galette (Adapted slightly from this Smitten Kitchen post, The Smitten Kitchen Cookbook and Seven Spoons)
Yields: 1 9-inch galette, Serves 6
You can click on the Seven Spoons link above for the larger pie recipe.
For the pastry:
1 1/4 cups all-purpose flour, plus more for work surface
1/4 teaspoon salt
8 tablespoons (1 sticks) unsalted butter, cut into pieces
1/4 cup sour cream or full-fat Greek yogurt
2 teaspoons fresh lemon juice
1/4 cup ice water
For the filling:
1 small butternut squash (about 1 1/4 pound)
1 1/2 tablespoons olive oil
1 teaspoon salt
Freshly ground black pepper
1 1/2 tablespoons of butter
1 large Vidalia or Spanish (sweet) onion, halved and thinly sliced in half-moons
Pinch of sugar
1/4 teaspoon cayenne (optional)
3/4 -1 cup grated Fontina cheese (about 2 1/2- 2 3/4 ounces). You could also use Gruyere.
3/4 teaspoon chopped fresh thyme
1 egg yolk beaten with 1 teaspoon of water, for optional glaze. (It gives the galette more of a croissant-looking finish.)
Preparation
To make pastry: In a bowl, combine the flour and salt. Add the stick of butter and, using a pastry blender, break up the bits of butter until the texture is like cornmeal, with the biggest pieces the size of pebbles. In a small bowl, whisk together the sour cream, lemon juice and water, and pour this over the butter-flour mixture. Stir with a spoon or a rubber spatula until a dough forms, kneading it once or twice on the counter if needed to bring it together. Do not over work the dough. Pat the dough into a ball, wrap it in plastic and chill it in the refrigerator for 1 hour or up to two days.
Prepare squash: Preheat oven to 400 degrees F. Peel squash, then halve and scoop out seeds. Cut into a 1/2-inch dice. Toss pieces with olive oil and a half-teaspoon of the salt, some freshly ground black pepper and roast on a baking sheet for 30 minutes or until pieces are tender, turning it midway if your oven bakes unevenly. Set aside to cool slightly. Leave the oven on.
Caramelize onions: While squash is roasting, melt butter in a heavy skillet and cook onion over low heat with the remaining half-teaspoon of salt and pinch of sugar, stirring occasionally, until soft and lightly golden brown, about 20-25 minutes. Stir in cayenne.
Mix squash, caramelized onions, cheese and herbs together in a bowl.
Assemble galette: On a floured work surface, roll the dough out into a 12-inch round. Transfer to a parchment lined baking sheet. Spread squash, onions, cheese and herb mixture over the dough, leaving a 1 1/2-inch border. Fold the border over the squash, onion and cheese mixture, pleating the edge to make it fit. The center will be open. (Optional: Brush the outside of the crust with the egg-yolk wash.)
Bake until golden brown, 30 to 40 minutes. Remove from the oven, let stand for 5 minutes, then slide the galette onto a serving plate. Cut into wedges and serve hot, warm or at room temperature.

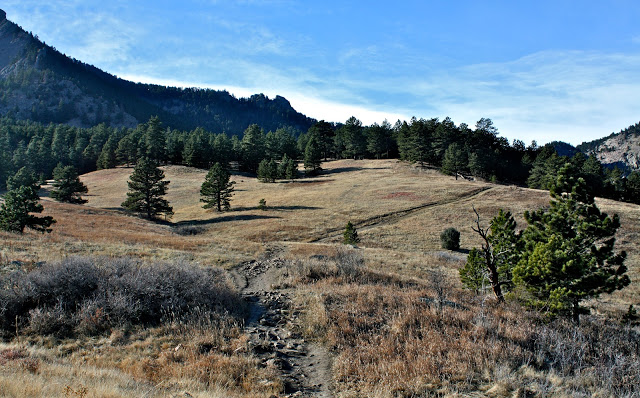
Now I've been consuming a lot of great food since Thanksgiving. We've had some wonderful meals, terrific desserts and a Fondue party, where there wasn't an ounce of restraint in sight. So we decided to take the kids on a hike in an effort to kind of "work it off" a little. I thought our last hike of the year was going to be this one near Boulder, but the weather turned out to be mild for another few days, so more hiking was in store. There really is nothing like fresh air, right?


You can click on the Seven Spoons link above for the larger pie recipe.
For the pastry:
1 1/4 cups all-purpose flour, plus more for work surface
1/4 teaspoon salt
8 tablespoons (1 sticks) unsalted butter, cut into pieces
1/4 cup sour cream or full-fat Greek yogurt
2 teaspoons fresh lemon juice
1/4 cup ice water
For the filling:
1 small butternut squash (about 1 1/4 pound)
1 1/2 tablespoons olive oil
1 teaspoon salt
Freshly ground black pepper
1 1/2 tablespoons of butter
1 large Vidalia or Spanish (sweet) onion, halved and thinly sliced in half-moons
Pinch of sugar
1/4 teaspoon cayenne (optional)
3/4 -1 cup grated Fontina cheese (about 2 1/2- 2 3/4 ounces). You could also use Gruyere.
3/4 teaspoon chopped fresh thyme
1 egg yolk beaten with 1 teaspoon of water, for optional glaze. (It gives the galette more of a croissant-looking finish.)
Preparation
To make pastry: In a bowl, combine the flour and salt. Add the stick of butter and, using a pastry blender, break up the bits of butter until the texture is like cornmeal, with the biggest pieces the size of pebbles. In a small bowl, whisk together the sour cream, lemon juice and water, and pour this over the butter-flour mixture. Stir with a spoon or a rubber spatula until a dough forms, kneading it once or twice on the counter if needed to bring it together. Do not over work the dough. Pat the dough into a ball, wrap it in plastic and chill it in the refrigerator for 1 hour or up to two days.
Prepare squash: Preheat oven to 400 degrees F. Peel squash, then halve and scoop out seeds. Cut into a 1/2-inch dice. Toss pieces with olive oil and a half-teaspoon of the salt, some freshly ground black pepper and roast on a baking sheet for 30 minutes or until pieces are tender, turning it midway if your oven bakes unevenly. Set aside to cool slightly. Leave the oven on.
Caramelize onions: While squash is roasting, melt butter in a heavy skillet and cook onion over low heat with the remaining half-teaspoon of salt and pinch of sugar, stirring occasionally, until soft and lightly golden brown, about 20-25 minutes. Stir in cayenne.
Mix squash, caramelized onions, cheese and herbs together in a bowl.
Assemble galette: On a floured work surface, roll the dough out into a 12-inch round. Transfer to a parchment lined baking sheet. Spread squash, onions, cheese and herb mixture over the dough, leaving a 1 1/2-inch border. Fold the border over the squash, onion and cheese mixture, pleating the edge to make it fit. The center will be open. (Optional: Brush the outside of the crust with the egg-yolk wash.)
Bake until golden brown, 30 to 40 minutes. Remove from the oven, let stand for 5 minutes, then slide the galette onto a serving plate. Cut into wedges and serve hot, warm or at room temperature.
Now I've been consuming a lot of great food since Thanksgiving. We've had some wonderful meals, terrific desserts and a Fondue party, where there wasn't an ounce of restraint in sight. So we decided to take the kids on a hike in an effort to kind of "work it off" a little. I thought our last hike of the year was going to be this one near Boulder, but the weather turned out to be mild for another few days, so more hiking was in store. There really is nothing like fresh air, right?
The Garden of the Gods is a place we've been only once, so it was nice to be back. The rock formations are gorgeous and the views (you can see Pikes Peak, a 14,000 foot mountain) are spectacular. The hike itself is on a paved path so it's not exactly what I would call a rigorous trail, but it is a really nice place to take a walk. I hear there are more strenuous hikes in the area, which I hope to check out in the spring.
After our hike, we got in the car and started making our way back to Denver. We toyed with the idea of stopping by the 'Focus on the Family' headquarters and taking a family photo that was purposefully out of focus (something that is pretty much in-line with our sense of humor). And we thought that shot would make a pretty great image for our holiday card next year (if we can ever manage to get them out in time). But the boys were tired and so was I, so we just kept driving...
...and when we got home, I started thumbing through all those great cookbooks I've either purchased or been gifted over the past 12 months. And I started to menu plan...
I can't wait to share more recipes next year, but for now I'm signing off for the rest of 2012.
Have a wonderful holiday season and a very Happy New Year! Thank you for all the comments, the suggestions and the support. I has meant a lot to me.
See you in 2013!
Be well,
xoxo,
-Batya
an almost-winter hike (chautauqua) + an almost-winter soup (mushroom barley)

I suspect that anyone listening to the news these days has felt a deep sorrow that seems hard to shake. We aren't the parents of the slain children, or the siblings who have lost so much, or even the community members who have to pull together and pick up the pieces. We are simply people who feel a connection with the grieving community of Newtown because we are human.
Ever since the tragedy, I've been hugging my boys a little bit tighter, reading to them a little bit longer and telling them how much I love them a bit more often (if that is even possible).
A few months ago my friend suffered several personal losses in a row. When I asked her how she was doing she wrote: "I'm up in the mountains; the mountains are good for the soul."
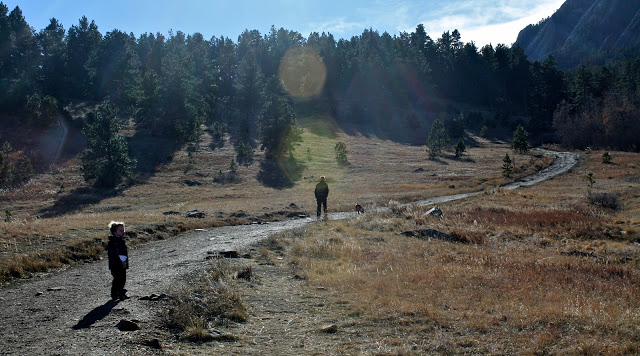
Monday felt like the right time to go to the mountains. It was warmer than it should have been and the sun was shining brightly. So we drove to Boulder and hiked a small trail near Chautauqua. It was beautiful.
We got some fresh air, got lost in our own thoughts and spent good, quality time with each other...the whole family.
When we got off the trail, I turned to my boys and asked them, "Do you know how much I love you?"
"So much," Otis replied with his arms fully extended.
"Yah," said Theo.
I ask them that each and every day...


I'm well into soup season and this one, from Mark Bittman, is really good. It will be a heavy-hitter in my soup rotation this winter. Enjoy it with your close friends and family.
xo,
Batya

Mushroom-Barley Soup (Adapted Slightly from Mark Bittman, Recipe of the Day)
The soup becomes a light meal with bread or, even better, croutons -- just brown slices of good bread on both sides in as much olive oil as you need.
Ingredients
- 1 ounce dried porcini mushrooms (about 1 cup)
- 2 tablespoons olive oil
- 1/4 pound shiitake or button mushrooms, stemmed and roughly chopped
- 3 medium carrots, peeled and sliced
- 1 cup pearl barley
- Salt and pepper
- 1 bay leaf
- 3 cups of vegetable stock (optional)
- 2 tablespoon soy sauce
Method
- 1. Soak porcini in 3 cups very hot water. Put olive oil in a medium saucepan and turn heat to high. Add shiitakes and carrots, and cook, stirring occasionally, until they begin to brown. Add barley, and continue to cook, stirring frequently, until it begins to brown; sprinkle with a little salt and pepper. Remove the porcini from their soaking liquid, and reserve liquid. Sort through porcini and discard any hard bits.
- 2. Add porcini to pot and cook, stirring, for about a minute. Add bay leaf, mushroom soaking water and 3 cups additional water (or stock, if you prefer). Bring to a boil, then lower the heat to a simmer; cook until barley is very tender, 20 to 30 minutes. {I had to cook the barley a bit longer-- and I added a few tablespoons of water every few minutes until I thought the consistency was right.} Add soy sauce, and taste. Add salt if necessary and plenty of pepper. Serve hot.


I enjoy traveling, photography, hiking, street art, design, architecture, food trucks, gardening, the cosmos, cooking with the seasons, political activism and wallpaper! I know my interests span a variety of categories, here's where they all come together.

